> For the complete documentation index, see [llms.txt](https://docs.soraco.co/docs/llms.txt). Markdown versions of documentation pages are available by appending `.md` to page URLs; this page is available as [Markdown](https://docs.soraco.co/docs/qlm-license-server/how-to-install-the-qlm-license-server-on-microsoft-azure.md).
# How to install the QLM License Server on Microsoft Azure
## QLM and Windows Azure Integration
**Important:** If you are using QLM v12 or higher, refer to the instructions [here.](https://support.soraco.co/hc/en-us/articles/360024356392-QLM-v12-Azure-Integration)
You can host the QLM License Server on a Windows Azure portal. The procedure outlined in this section will show you how to build a QLM Azure deployment package, how to create the database on the Azure Portal and finally how to connect QLM to the Azure hosted QLM License Server.
### 1. Database Creation
To create the QLM database on the Azure portal:
| cfd179310e1a417983b969f7fb8ccf98 | 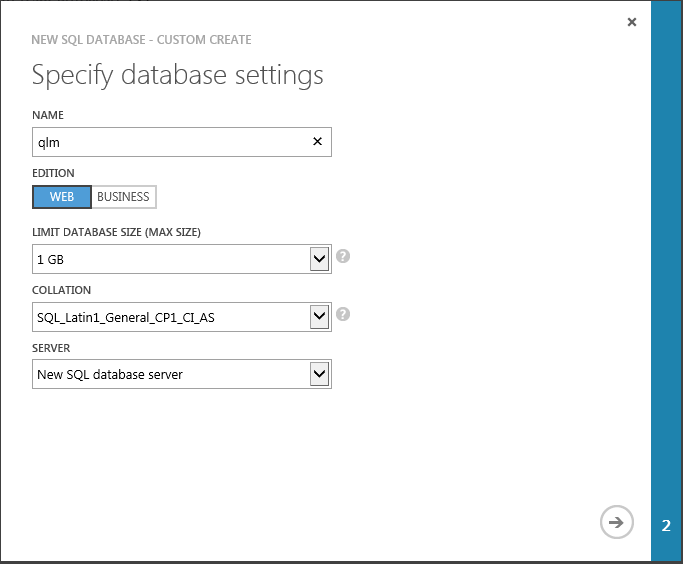 |
| ------------------------------------------------------------------------------------- | --------------------------------------------------------------------------------- |
| - Go to the Windows Azure Portal.
| |
| | |
| | |
| | |
| - Set the database name to: qlm
| |
| - Pick the server of your choice or create a new SQL database server.
| |
| - Click on Create SQL database.
| |
| - Go to the Windows Azure Portal.
|
| ------------------------------------------------------------------------------------- |
| |
| |
| |
| - Set the database name to: qlm
|
| - Pick the server of your choice or create a new SQL database server.
|
| - Click on Create SQL database.
|
### 2. Server settings
If you selected to create a new SQL database server on the previous step, you need to configure a user account on the SQL Server.
| fe0e3ea9138b4b378383b7a468758b54 | 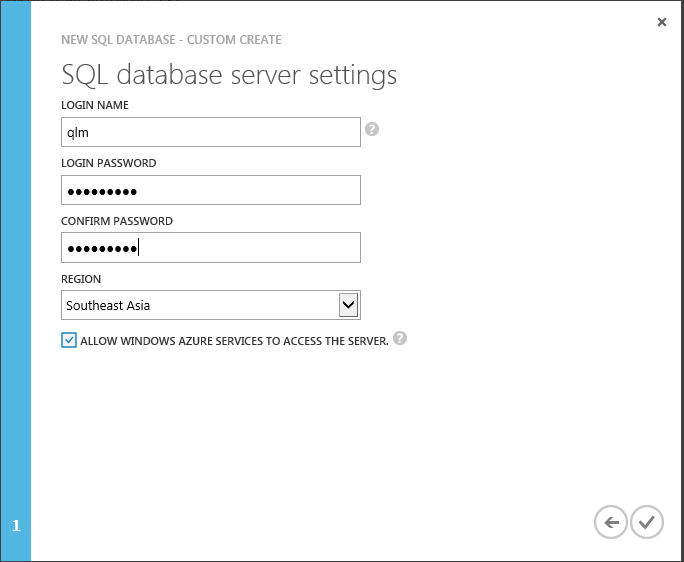 |
| -------------------------------------------------------------------------------------------------- | --------------------------------------------------------------------------------- |
| - Enter qlm as the login name of the server
| |
| | |
| | |
| - When done, confirm that you see the database in the list of available databases.
| |
|  | |
| - Enter qlm as the login name of the server
|
| -------------------------------------------------------------------------------------------------- |
| |
| |
| - When done, confirm that you see the database in the list of available databases.
|
### 3. Configure the database
Now that the database is created, we need to create the tables and stored procedures. Follow the steps below:
| cde9d166c29d4f19a6d447ff444a637e | 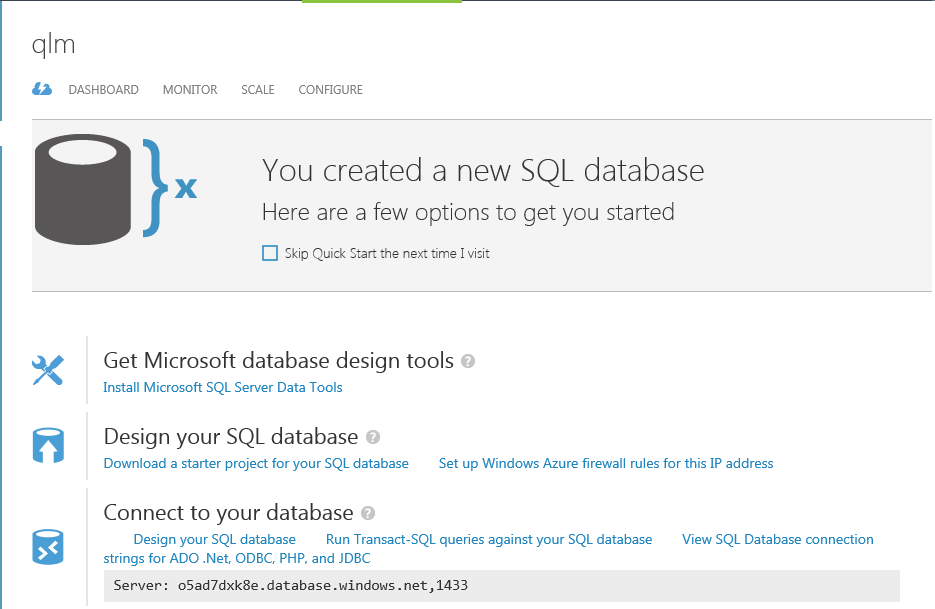 |
| ------------------------------------------------------------------------------------------------------------------------------------------------------------------------------------------------------------ | --------------------------------------------------------------------------------- |
| - Click on the QLM database in the list
| |
| - In the Connect to your database panel, click on "Run Transact-SQL queries against your SQL database.
| |
| 0109b5403f284862aa2fa980bb4f4640 | 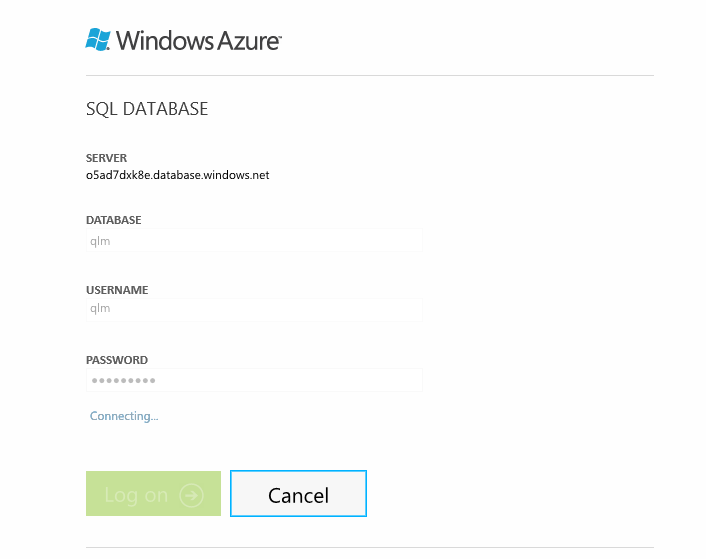 |
| - When prompted to login, enter your SQL Server credentials.
| |
| ea5d5a3bbc9b4020b9bc2d7ead8238e7 | 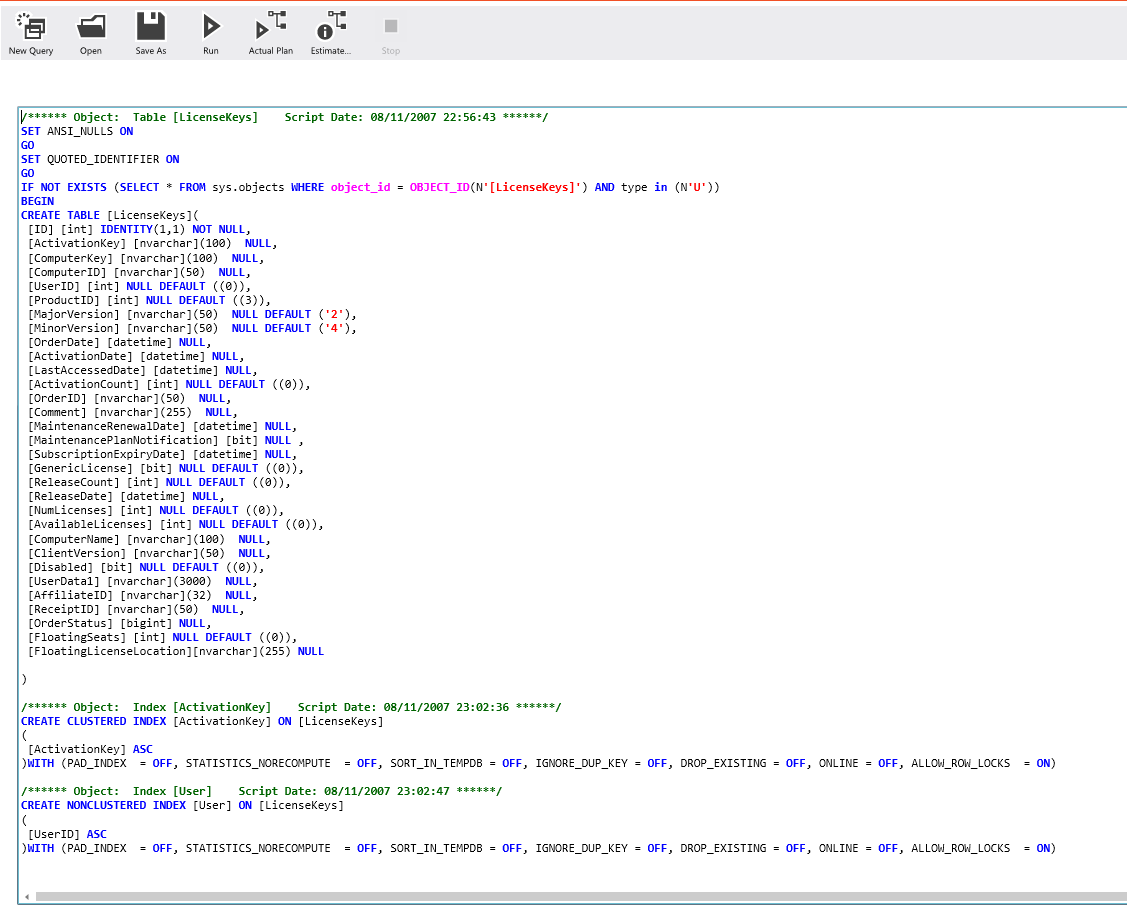 |
| - Click on New Query and paste the content of the file: %Public%\Documents\Quick License Manager\DeployToAzure\Db\qlm.createtables.sql
| |
| - Click on Run to execute the query
| |
| - Repeat these two steps for the following files, in the exact order listed here: InstallCommon.sql, InstallRoles.sql, InstallPersonalization.sql, InstallProfile.sql, InstallMembership.sql
| |
| - Click on New Query and paste the content of the file: %Public%\Documents\Quick License Manager\DeployToAzure\Db\qlm.createtables.sql
|
| ------------------------------------------------------------------------------------------------------------------------------------------------------------------------------------------------------------ |
| - Click on Run to execute the query
|
| - Repeat these two steps for the following files, in the exact order listed here: InstallCommon.sql, InstallRoles.sql, InstallPersonalization.sql, InstallProfile.sql, InstallMembership.sql
|
| - When prompted to login, enter your SQL Server credentials.
|
| ---------------------------------------------------------------------------- |
| - Click on the QLM database in the list
|
| ---------------------------------------------------------------------------------------------------------------------- |
| - In the Connect to your database panel, click on "Run Transact-SQL queries against your SQL database.
|
### 4. Creating the QLM package
To deploy the QLM License Server to Windows Azure, you must create an Azure package by following the steps oultined below:
| 677756eb4c064d139c75306095569845 | 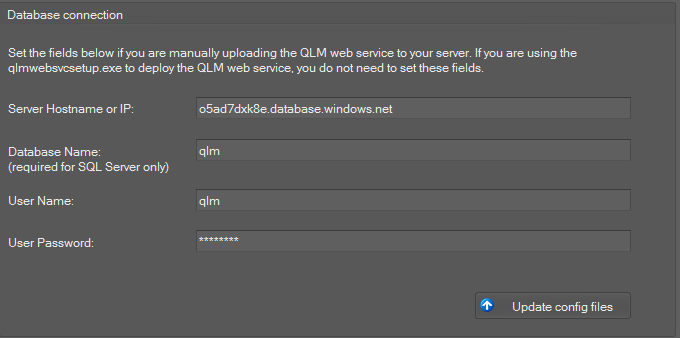 |
| ------------------------------------------------------------------------------------------------------------------------------------------------------------------------------------------------------------------------------------------------ | --------------------------------------------------------------------------------- |
| - Launch the QLM Management Console and go to the Manage Keys tab
| |
| - Click on the Sites button in the toolbar, then click on Add
| |
| - Enter a name for your Azure site, say QlmAzure, and click OK.
| |
| - In the Primary Site field, enter (you can replace 'myqlm' with any value of your choice):
| |
| - If you replaced 'myqlm' with any other value, note that you will need to use the same value later on in this procedure.
| |
| - Set the Database Engine to: SQL Server
| |
| - Click on the Encryption Keys tab, then click New for both fields to generate a CommunicationEncryptionKey and an AdminEncryptionKey
| |
| - Click on the Database Connection tab and enter all the fields on this tab
| |
| - Server Hostname or IP: to get this value, select your database in Azure, and click on the Dashboard link. The SERVER NAME field is displayed in the right hand panel and typically looks like: o5ad7dxk8e.database.windows.net
| |
| - Database Name: qlm or any other name you have entered earlier in the process
| |
| - User Name: name of the user you specified earlier in the process
| |
| - User Password: password of the user you specified earlier in the process
| |
| - Click on Update config files
| |
| - Do not click OK -- leave the Sites editor open.
| |
| - The next steps involve building the package using Visual Studio 2015. You will need to first install the Azure SDK for .NET.
| |
| - Open and Build the QlmAzure solution located in the %Public%\Documents\Quick License Manager\DeployToAzure\ folder using Visual Studio 2012
| |
| - Right mouse click on the QlmAzure project and select "Package"
| |
| - Set the Service Configuration to Cloud and Build Configuration to Release then click on Package
| |
| - The following 2 files will be created in the QlmAzure\QlmAzure\bin\Release\app.publish folder: QlmAzure.cspkg and ServiceConfiguration.Cloud.cscfg files
| |
| - The next steps involve building the package using Visual Studio 2015. You will need to first install the Azure SDK for .NET.
|
| --------------------------------------------------------------------------------------------------------------------------------------------------------------------------------------------------------- |
| - Open and Build the QlmAzure solution located in the %Public%\Documents\Quick License Manager\DeployToAzure\ folder using Visual Studio 2012
|
| - Right mouse click on the QlmAzure project and select "Package"
|
| - Set the Service Configuration to Cloud and Build Configuration to Release then click on Package
|
| - The following 2 files will be created in the QlmAzure\QlmAzure\bin\Release\app.publish folder: QlmAzure.cspkg and ServiceConfiguration.Cloud.cscfg files
|
| - Launch the QLM Management Console and go to the Manage Keys tab
|
| ------------------------------------------------------------------------------------------------------------------------------------------------------------------------------------------------------------------------------------------------ |
| - Click on the Sites button in the toolbar, then click on Add
|
| - Enter a name for your Azure site, say QlmAzure, and click OK.
|
| - In the Primary Site field, enter (you can replace 'myqlm' with any value of your choice):
|
| - If you replaced 'myqlm' with any other value, note that you will need to use the same value later on in this procedure.
|
| - Set the Database Engine to: SQL Server
|
| - Click on the Encryption Keys tab, then click New for both fields to generate a CommunicationEncryptionKey and an AdminEncryptionKey
|
| - Click on the Database Connection tab and enter all the fields on this tab
|
| - Server Hostname or IP: to get this value, select your database in Azure, and click on the Dashboard link. The SERVER NAME field is displayed in the right hand panel and typically looks like: o5ad7dxk8e.database.windows.net
|
| - Database Name: qlm or any other name you have entered earlier in the process
|
| - User Name: name of the user you specified earlier in the process
|
| - User Password: password of the user you specified earlier in the process
|
| - Click on Update config files
|
| - Do not click OK -- leave the Sites editor open.
|
### 5. Cloud Service
Finally, we need to create the Azure Cloud Service and deploy the QLM package to the Azure portal:
| 720469f3126649a1a0855930ebc7ca05 | 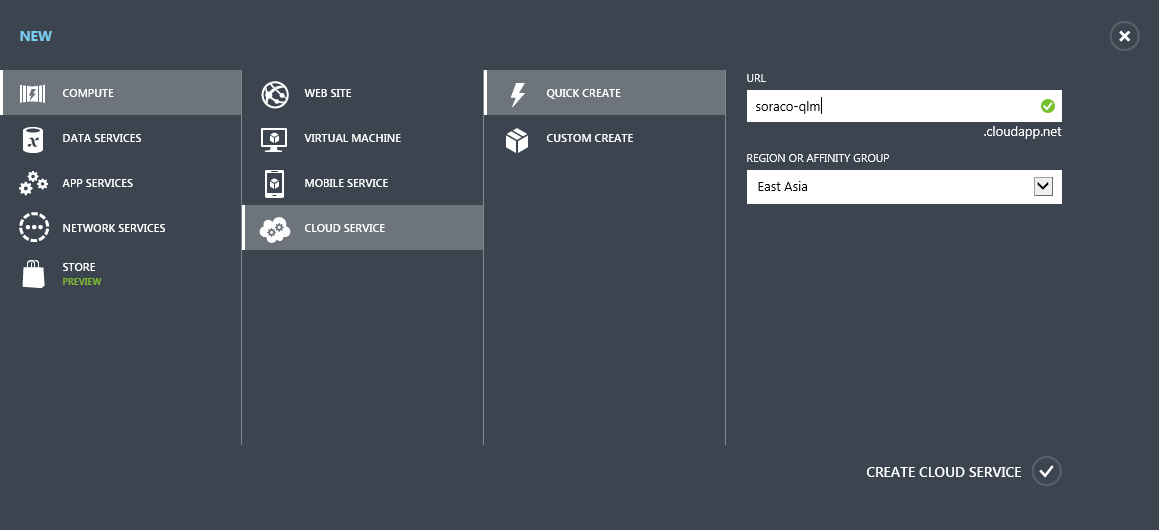 |
| ----------------------------------------------------------------------------------------------------------------------------------------------------- | --------------------------------------------------------------------------------- |
| - Go to the Windows Azure Portal.
| |
| | |
| | |
| | |
| - Set the URL to any value of your choice that matches the value you set earlier on Sites page: myqlm
| |
| - Set the region to any value of your choice.
| |
| - Click on Create Cloud Service.
| |
| 6a9516e6c88a416ead6a9893bdcbb010 | 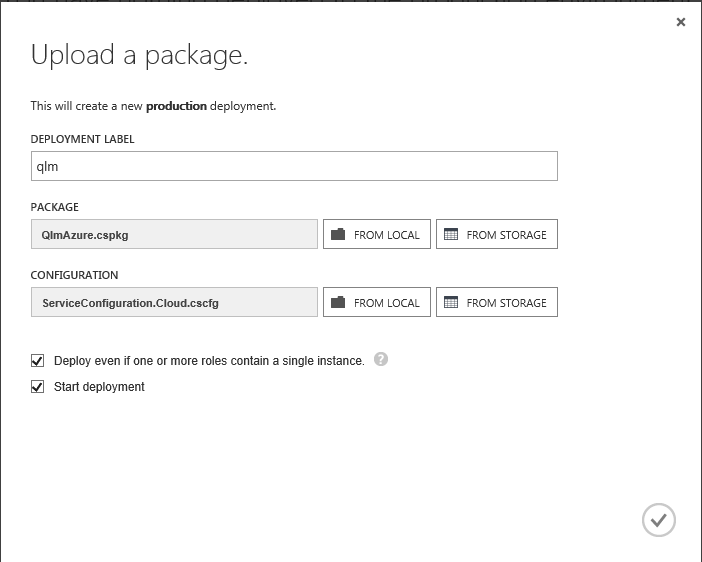 |
| - Once created, click on the service and select Upload a new production deployment.
| |
| - In the Deployment label field, enter: QLM
| |
| - In the Package field, click From Local and select the QlmAzure.cspkg file created earlier
| |
| - In the Configuration field, click From Local and select the Service.Configuration.Cloud.cscfg file created earlier
| |
| - Check "Deploy even if one or more roles contain a single instance".
| |
| - Check "Start deployment".
| |
| - Click on the checkmark at the bottom of the page
| |
| 2163f60ada0d4c4cbefdb5c32d315f87 | 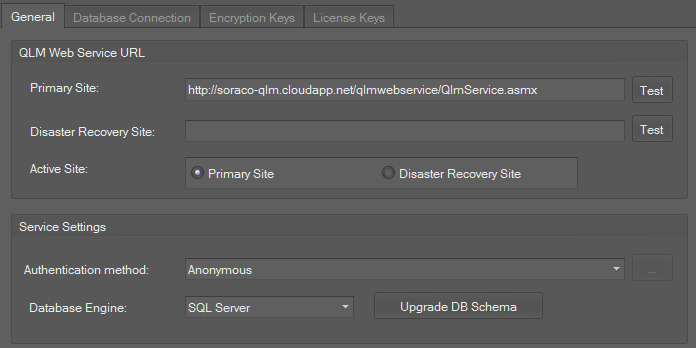 |
| - Once the package is created, click on Dashboard link to view details about the package. Take note of the Site Url
| |
| - Now go back to the QLM Management Console, Manage Keys / Sites which you left open earlier.
| |
| - On the General tab, set the Primary Site to: \/qlmwebservice/qlmservice.asmx
| |
| - Click the Test button next to the primary site URL and confirm that all tests have passed.
| |
| - Once the package is created, click on Dashboard link to view details about the package. Take note of the Site Url
|
| ---------------------------------------------------------------------------------------------------------------------------------------------------- |
| - Now go back to the QLM Management Console, Manage Keys / Sites which you left open earlier.
|
| - On the General tab, set the Primary Site to: \/qlmwebservice/qlmservice.asmx
|
| - Click the Test button next to the primary site URL and confirm that all tests have passed.
|
| - Once created, click on the service and select Upload a new production deployment.
|
| ----------------------------------------------------------------------------------------------------------------------------------------------------- |
| - In the Deployment label field, enter: QLM
|
| - In the Package field, click From Local and select the QlmAzure.cspkg file created earlier
|
| - In the Configuration field, click From Local and select the Service.Configuration.Cloud.cscfg file created earlier
|
| - Check "Deploy even if one or more roles contain a single instance".
|
| - Check "Start deployment".
|
| - Click on the checkmark at the bottom of the page
|
| - Go to the Windows Azure Portal.
|
| -------------------------------------------------------------------------------------------------------------------------------------- |
| |
| |
| |
| - Set the URL to any value of your choice that matches the value you set earlier on Sites page: myqlm
|
| - Set the region to any value of your choice.
|
| - Click on Create Cloud Service.
|
This completes the configuration of the Azure site.