> For the complete documentation index, see [llms.txt](https://docs.soraco.co/docs/llms.txt). Markdown versions of documentation pages are available by appending `.md` to page URLs; this page is available as [Markdown](https://docs.soraco.co/docs/qlm-license-server/qlm-and-windows-azure-integration-v10.md).
# QLM and Windows Azure Integration (v10)
**\[This article applies to QLM v11 and earlier. if you are using QLM v12, refer to this** [**article**](https://support.soraco.co/hc/en-us/articles/360024356392-QLM-v12-Azure-Integration) **instead.]**
You can host the QLM License Server on a Windows Azure portal. The procedure outlined in this section will show you how to build a QLM Azure deployment package, how to create the database on the Azure Portal and finally how to connect QLM to the Azure hosted QLM License Server.
### 1. Database Creation
To create the QLM database on the Azure portal:
| e4564be23a294f91bd44a28feeb35c32 | 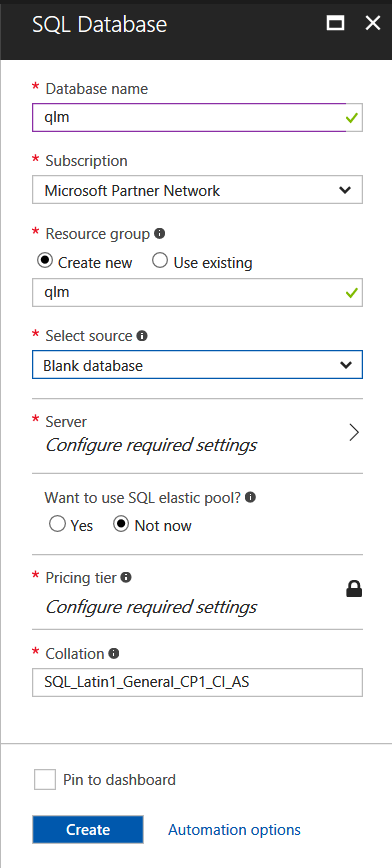 |
| ---------------------------------------------------------------------------------- | ------------------------------------------------------------------------------- |
| - Go to the Windows Azure Portal.
| |
| | |
| | |
| - Set the database name to: qlm
| |
| - Pick the Subscription, and Resource Group server of your choice.
| |
| - Set the Select Source field to "Blank database"
| |
| - Select an existing Server or create a New Server
| |
| - Select whether you want to use a SQL Elastic pool
| |
| | |
| - Use the default Collation
| |
| | |
| - Go to the Windows Azure Portal.
|
| ---------------------------------------------------------------------------------- |
| |
| |
| - Set the database name to: qlm
|
| - Pick the Subscription, and Resource Group server of your choice.
|
| - Set the Select Source field to "Blank database"
|
| - Select an existing Server or create a New Server
|
| - Select whether you want to use a SQL Elastic pool
|
| |
| - Use the default Collation
|
| |
### 2. Server settings
If you selected to create a new SQL database server on the previous step, you need to configure a user account on the SQL Server.
| 8bc6b3ce1bc8480783fd6a070566e00c | 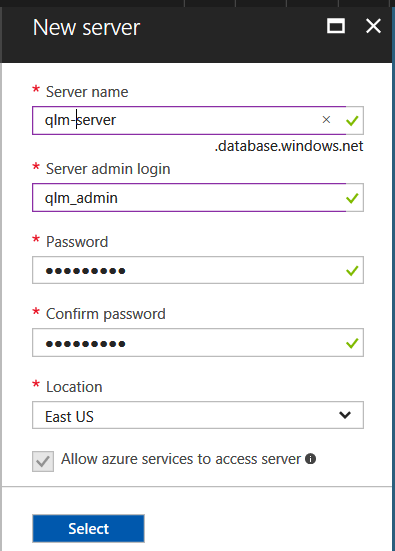 |
| --------------------------------------------------------------------------------------------------- | ------------------------------------------------------------------------------- |
| - In the Server name field, enter a name of your choice. Example: qlm-server
| |
| - In the Server admin login field, enter a name of your choice. Example: qlm\_admin
| |
| - In the password and confirm password fields, enter a new password
| |
| | |
| | |
| - In the Server name field, enter a name of your choice. Example: qlm-server
|
| --------------------------------------------------------------------------------------------------- |
| - In the Server admin login field, enter a name of your choice. Example: qlm\_admin
|
| - In the password and confirm password fields, enter a new password
|
| |
| |
| |
### 3. Configure the database
Now that the database is created, we need to create the tables and stored procedures. Follow the steps below:
| 430a97f101a34f18934d2bc5d94a0a73 | 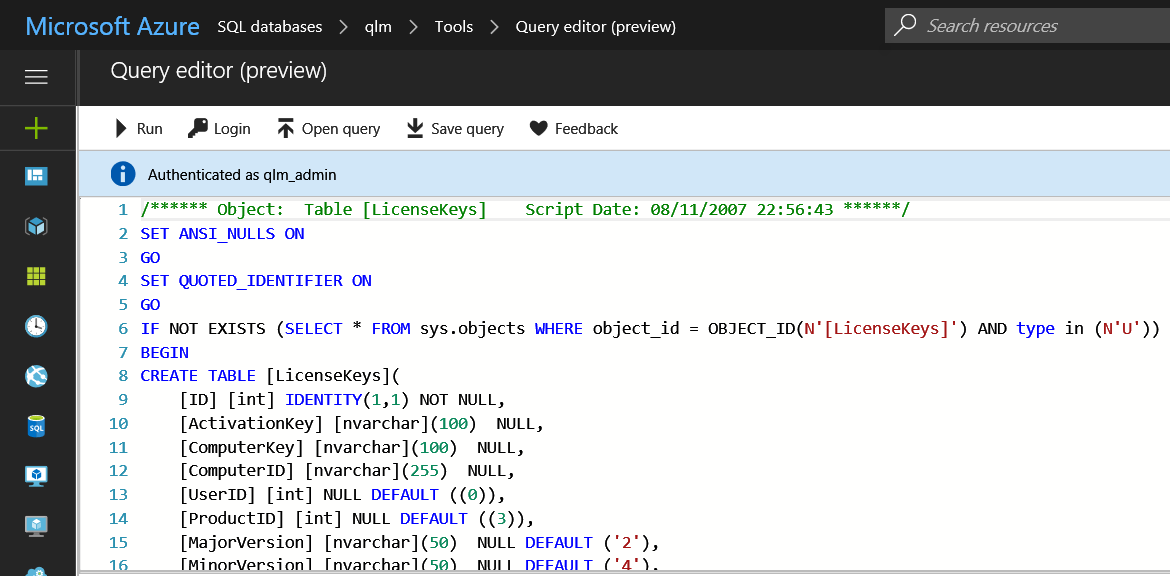 |
| ---------------------------------------------------------------------------------------------------------------------------------------------------------------------------------------------------------------------------------------------------------------------------------------------------------------------------------------------------------------------------------------------------------------------------------------------------------------------------------------------------------------------- | ------------------------------------------------------------------------------- |
| - Click on the QLM database in the list
- Click Tools
- Click Query Editor
- Click login and enter your credentials
- Click Open Query and select: %Public%\Documents\Quick License Manager\DeployToAzure\Db\qlm.createtables.sql
- Click on Run to execute the query
- Repeat these two steps for the following files, in the exact order listed here: InstallCommon.sql, InstallRoles.sql, InstallPersonalization.sql, InstallProfile.sql, InstallMembership.sql
| |
| - Click on the QLM database in the list
- Click Tools
- Click Query Editor
- Click login and enter your credentials
- Click Open Query and select: %Public%\Documents\Quick License Manager\DeployToAzure\Db\qlm.createtables.sql
- Click on Run to execute the query
- Repeat these two steps for the following files, in the exact order listed here: InstallCommon.sql, InstallRoles.sql, InstallPersonalization.sql, InstallProfile.sql, InstallMembership.sql
|
| ---------------------------------------------------------------------------------------------------------------------------------------------------------------------------------------------------------------------------------------------------------------------------------------------------------------------------------------------------------------------------------------------------------------------------------------------------------------------------------------------------------------------- |
### 4. Creating the QLM package
To deploy the QLM License Server to Windows Azure, you must create an Azure package by following the steps oultined below:
| cbf1d8cec6d44846b55898b4cb2ea478 | 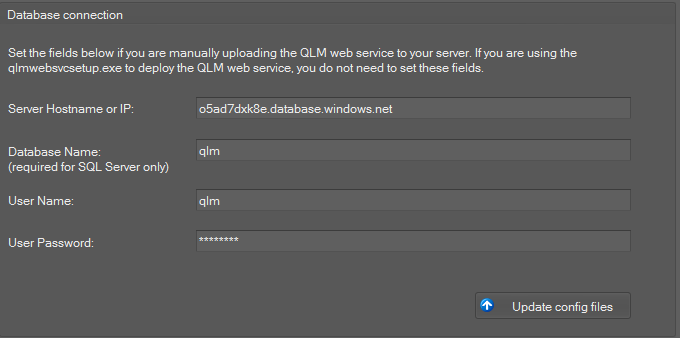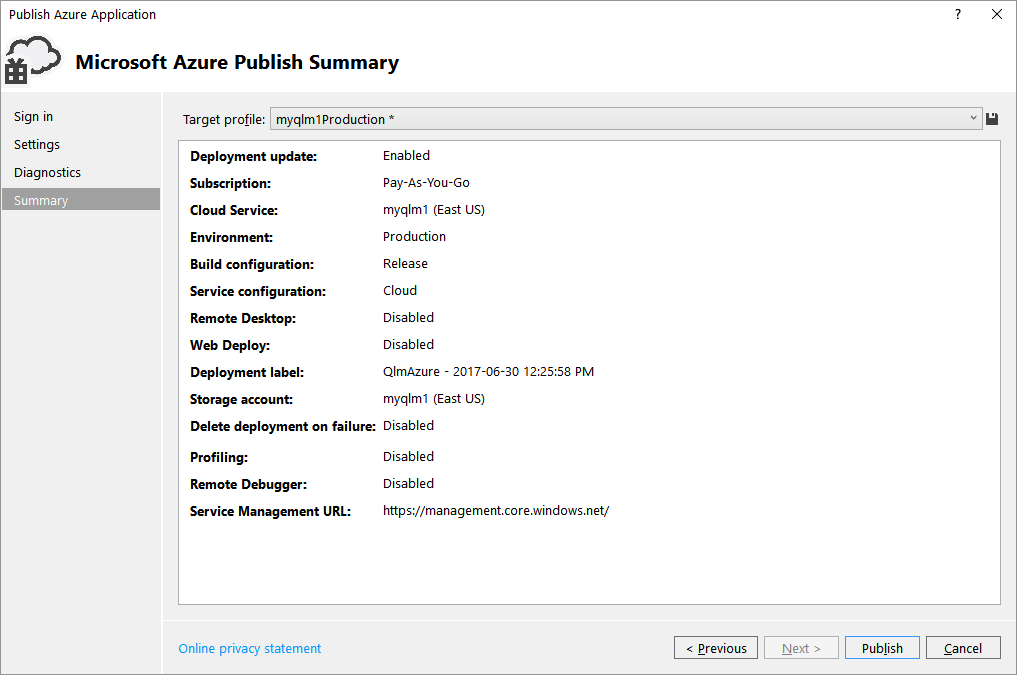 |
| ----------------------------------------------------------------------------------------------------------------------------------------------------------------------------------------------------------------------------------------------------------------------------------------------------------------- | -------------------------------------------------------------------------------------------------------------------------------------------------------------- |
| - Launch the QLM Management Console and go to the Manage Keys tab
| |
| - Click on the Sites button in the toolbar, then click on Add
| |
| - Enter a name for your Azure site, say QlmAzure, and click OK.
| |
| - In the Primary Site field, enter (you can replace 'myqlm' with any value of your choice):
| |
| - If you replaced 'myqlm' with any other value, note that you will need to use the same value later on in this procedure.
| |
| - Set the Database Engine to: SQL Server
| |
| - Click on the Encryption Keys tab, then click New for both fields to generate a CommunicationEncryptionKey and an AdminEncryptionKey
| |
| - Click on the Database Connection tab and enter all the fields on this tab
| |
| - Server Hostname or IP: to get this value, select your database in Azure, and click on the Overview tab.
- Click Show database connection strings
- In the ADO.NET tab, copy the value of the Server entry. The value typically looks like: tcp:qlm-server.database.windows.net,1433
| |
| - Database Name: qlm or any other name you have entered earlier in the process
| |
| - User Name: name of the sql admin user you specified earlier in the process
| |
| - User Password: password of the sql admin user you specified earlier in the process
| |
| - Click on Update config files
| |
| - Do not click OK -- leave the Sites editor open.
| |
| - The next steps involve building the package using Visual Studio 2017/2015. You will need to first install the Azure SDK for .NET.
| |
| - Open and Build the QlmAzure solution located in the %Public%\Documents\Quick License Manager\DeployToAzure\ folder using Visual Studio 2017/2015
| |
| - Right mouse click on the QlmAzure project and select "Package"
| |
| - Set the Service Configuration to Cloud and Build Configuration to Release then click on Package
| |
| - The following 2 files will be created in the QlmAzure\QlmAzure\bin\Release\app.publish folder: QlmAzure.cspkg and ServiceConfiguration.Cloud.cscfg files
| |
| - The next steps involve building the package using Visual Studio 2017/2015. You will need to first install the Azure SDK for .NET.
|
| -------------------------------------------------------------------------------------------------------------------------------------------------------------------------------------------------------------- |
| - Open and Build the QlmAzure solution located in the %Public%\Documents\Quick License Manager\DeployToAzure\ folder using Visual Studio 2017/2015
|
| - Right mouse click on the QlmAzure project and select "Package"
|
| - Set the Service Configuration to Cloud and Build Configuration to Release then click on Package
|
| - The following 2 files will be created in the QlmAzure\QlmAzure\bin\Release\app.publish folder: QlmAzure.cspkg and ServiceConfiguration.Cloud.cscfg files
|
| - Launch the QLM Management Console and go to the Manage Keys tab
|
| ----------------------------------------------------------------------------------------------------------------------------------------------------------------------------------------------------------------------------------------------------------------------------------------------------------------- |
| - Click on the Sites button in the toolbar, then click on Add
|
| - Enter a name for your Azure site, say QlmAzure, and click OK.
|
| - In the Primary Site field, enter (you can replace 'myqlm' with any value of your choice):
|
| - If you replaced 'myqlm' with any other value, note that you will need to use the same value later on in this procedure.
|
| - Set the Database Engine to: SQL Server
|
| - Click on the Encryption Keys tab, then click New for both fields to generate a CommunicationEncryptionKey and an AdminEncryptionKey
|
| - Click on the Database Connection tab and enter all the fields on this tab
|
| - Server Hostname or IP: to get this value, select your database in Azure, and click on the Overview tab.
- Click Show database connection strings
- In the ADO.NET tab, copy the value of the Server entry. The value typically looks like: tcp:qlm-server.database.windows.net,1433
|
| - Database Name: qlm or any other name you have entered earlier in the process
|
| - User Name: name of the sql admin user you specified earlier in the process
|
| - User Password: password of the sql admin user you specified earlier in the process
|
| - Click on Update config files
|
| - Do not click OK -- leave the Sites editor open.
|
### 5. Cloud Service
To deploy the QLM Cloud Service to the Azure portal:
| cc7373e687f44b22a115d668fdf98fe4 | 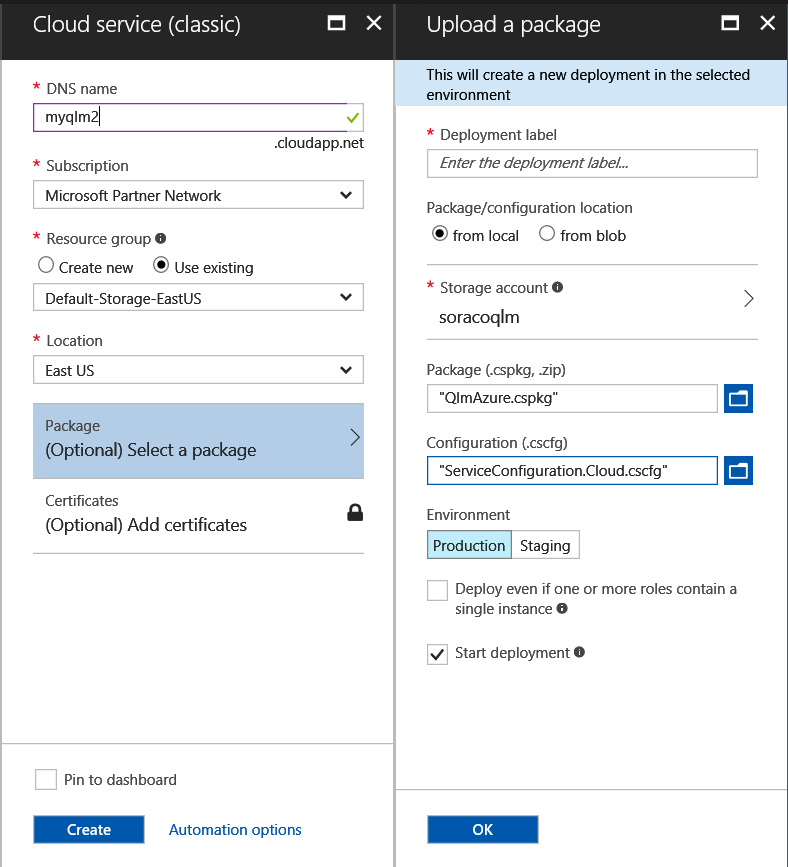 |
| ------------------------------------------------------------------------------------------------------------------------------------------------------------------- | --------------------------------------------------------------------------------- |
| - Go to the Windows Azure Portal.
| |
| - Select Cloud Services (classic)
| |
| | |
| - Set the DNS name to any value of your choice that matches the value you set earlier on Sites page: myqlm
| |
| - Set the Subscription, Resource Group and Location to any value of your choice.
| |
| - Click on Package / Select a Package.
| |
| - Enter a Deployment label of your choice
| |
| - Set the Package/configuration location to from local.
| |
| | |
| - In the Package (.cspkg) field, select the file QlmAzure.cspkg that was generated earlier from the Visual Studio solution.
| |
| - In the Configuration (.cscfg) field, select the file ServiceConfiguration.Cloud.cscfg that was generated earlier from the Visual Studio solution.
| |
| - Select the Environment of your choice
| |
| | |
| | |
| | |
| 66e344cb29bb4692950e80a7bbe4aa58 | 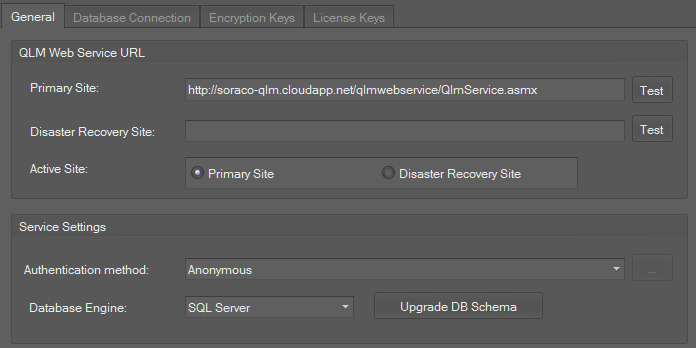 |
| - Once the package is created, click on service that was created and go to the OverView tab. Take note of the Site Url
| |
| - Now go back to the QLM Management Console, Manage Keys / Sites which you left open earlier.
| |
| - On the General tab, set the Primary Site to: \/qlmlicenseserver/qlmservice.asmx
| |
| - Click the Test button next to the primary site URL and confirm that all tests have passed.
| |
| - Once the package is created, click on service that was created and go to the OverView tab. Take note of the Site Url
|
| ------------------------------------------------------------------------------------------------------------------------------------------------------- |
| - Now go back to the QLM Management Console, Manage Keys / Sites which you left open earlier.
|
| - On the General tab, set the Primary Site to: \/qlmlicenseserver/qlmservice.asmx
|
| - Click the Test button next to the primary site URL and confirm that all tests have passed.
|
| - Go to the Windows Azure Portal.
|
| ------------------------------------------------------------------------------------------------------------------------------------------------------------------- |
| - Select Cloud Services (classic)
|
| |
| - Set the DNS name to any value of your choice that matches the value you set earlier on Sites page: myqlm
|
| - Set the Subscription, Resource Group and Location to any value of your choice.
|
| - Click on Package / Select a Package.
|
| - Enter a Deployment label of your choice
|
| - Set the Package/configuration location to from local.
|
| |
| - In the Package (.cspkg) field, select the file QlmAzure.cspkg that was generated earlier from the Visual Studio solution.
|
| - In the Configuration (.cscfg) field, select the file ServiceConfiguration.Cloud.cscfg that was generated earlier from the Visual Studio solution.
|
| - Select the Environment of your choice
|
| |
| |
| |
This completes the configuration of the Azure site.
**How to upgrade an existing Azure deployment with a new version of QLM**
* Install the new version of QLM on your system
* Go to the Manage Keys tab
* Click Sites and select your site
* Go to the Database Connection tab
* Confirm that all the settings are correct
* Click **Update config files**
* Open the QlmAzure solution located in the %Public%\Documents\Quick License Manager\DeployToAzure\ folder using Visual Studio 2017/2015
* Build the solution in Release mode.
* Right mouse click on the QlmAzure project and select "Package"
* Set the Service Configuration to **Cloud** and Build Configuration to **Release** then click on Package
* The following 2 files will be created in the QlmAzure\QlmAzure\bin\Release\app.publish folder: QlmAzure.cspkg and ServiceConfiguration.Cloud.cscfg files
* In the Azure portal, select the cloud service to update
* Click **Update**
* Set a deployment label
* Select "from local"
* Select a storage account
* Set the package and configuration fields to the files created above.
* Select "Deploy even if one or more roles contain a single instance"
* Click Ok
#### Troubleshooting
You may get the following error when connecting to the QLM License Server:
*Cannot open server 'xxx' requested by the login. Client with IP address 'yyy' is not allowed to access the server. To enable access, use the Windows Azure Management Portal or run sp\_set\_firewall on the master database to create a firewall rule for this IP address or address range.*
To resolve this error, follow the steps below:
* In the Azure Portal, click SQL databases then click the QLM database
* Locate the Server name field and click on the server link
* Click "Firewalls and virtual networks"
* Create a new rule as follows:
* Rule 1
* Start IP: The IP address listed in the error message
* End IP: The IP address listed in the error message
* Click Save
* Wait a few minutes and then test again