> For the complete documentation index, see [llms.txt](https://docs.soraco.co/docs/llms.txt). Markdown versions of documentation pages are available by appending `.md` to page URLs; this page is available as [Markdown](https://docs.soraco.co/docs/qlm-license-server/how-to-install-the-qlm-license-server.md).
# How to install the QLM License Server v20
## Overview
The License Server is a web service with a SQL Server database that enables the following functionality:
* Online activation
* Server-side license validation
* License Management
* Customer Management
* Analytics
* and much more
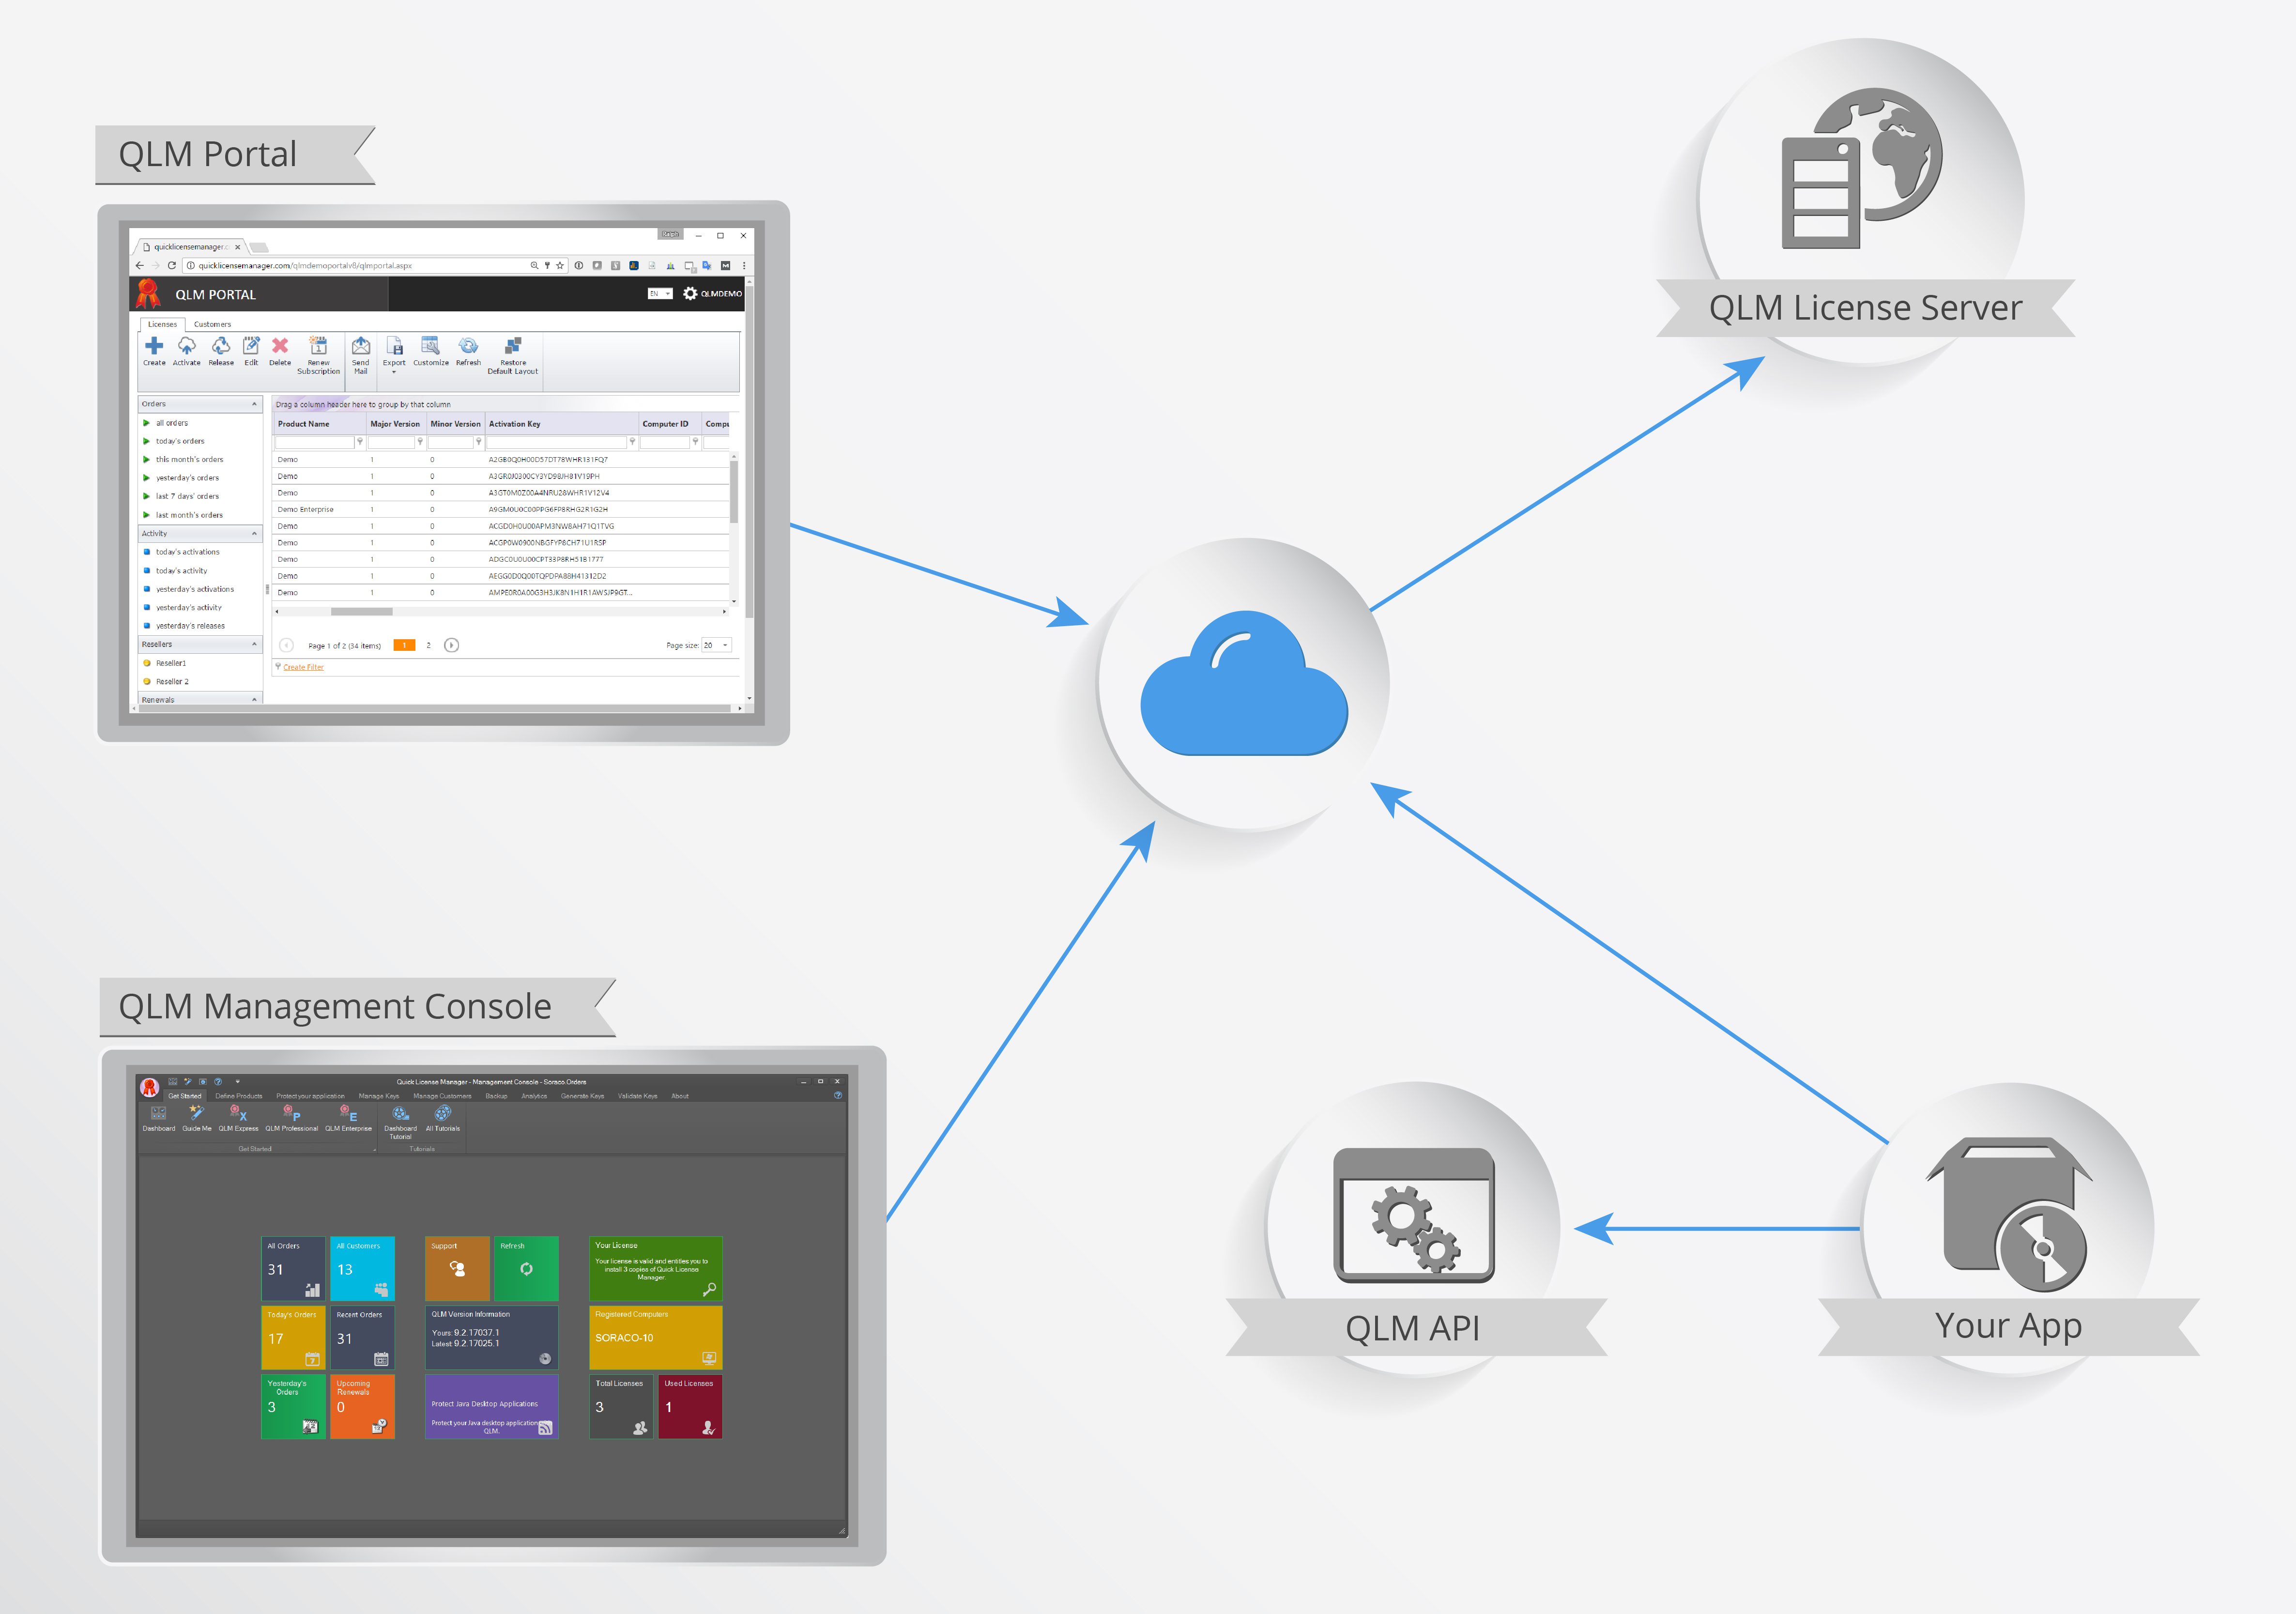 The QLM License Server must be installed in the cloud so that it is accessible to your customers.
The system requirements for the QLM License Server are:
* Windows 2012 R2 server or higher.
* [.NET 10 Hosting Bundle ](https://dotnet.microsoft.com/en-us/download/dotnet/10.0)10.0.5 or greater
* Microsoft SQL Server Database (any edition including the free SQL Server Express)
* [Microsoft OLE DB Driver for SQL Server v19](https://learn.microsoft.com/en-us/sql/connect/oledb/download-oledb-driver-for-sql-server?view=sql-server-ver17)
* [Visual C++ Redistributables for x86 and x64 (for Visual Studio 2017)](https://learn.microsoft.com/en-us/cpp/windows/latest-supported-vc-redist?view=msvc-170)
*Before installing the QLM License Server, make sure the above components are installed on your system. To install IIS and enable ASP.NET on your Windows Server, read this* [*article*](https://technet.microsoft.com/en-us/library/hh831475\(v=ws.11\).aspx)*.*
The License Server can be installed in 2 ways: (a) by running the provided setup program QlmLicenseServerSetup.exe or (b) by executing the installation steps manually.
If you are hosting your own website, then the procedure **\[1]** below is recommended. If your site is hosted at an ISP, then you may need to use the procedure **\[2]**.
## Automated installation
### License Server Installation
To install the QLM License Server:
* Locate the setup program in the QLM installation folder. Typically this file is located under:
* QLM v20 and higher: %Public%\Documents\Quick License Manager\DeployToServer\QlmLicenseServerSetupNetCore.exe
* QLM v8 and higher: %Public%\Documents\Quick License Manager\DeployToServer\QlmLicenseServerSetup.exe
* QLM v7: C:\Program Files\Soraco\QuickLicenseMgr\DeployToServer\QlmLicenseServerSetup.exe
* Copy the setup file to your server
* Execute the setup on the server
* Follow the onscreen instructions.
### QLM Management Console Configuration
To configure the QLM Management Console to connect to your QLM License Server:
* Launch the QLM Management Console
* Go to the Manage Keys tab
* Click Sites
* Click Add to add a new site
* Specify a site name
* In the Primary site field, enter the URL to the License Server: For example:
* Set the Database Engine to SQL Server
* Go to the Encryption Keys tab, then click New for CommunicationEncryptionKey and AdminEncryptionKey
* On the server where you installed the QLM License Server, edit each appsettings.json file and update the value of the CommunicationEncryptionKey and AdminEncryptionKey to the values created above (do not remove the curly braces).
* Go back to the QLM Management Console / Manage Keys / Sites / General tab and click the Test button
* If you get an error saying that no products were found, click the **Upload products to License Server** button.
* Then click on Test again to confirm that all tests pass.
## Manual installation
### Configuring the Database
QLM Professional and Enterprise store license keys as well as customer-related information in a database on the License Server.
* Use the tools provided by your ISP to create a database called qlm\_db. Alternatively, you can execute the sql.createdb.sql script located in:
* %Public%\Documents\Quick License Manager\DeployToServer\QlmLicenseServerNetCore\Db.
* You may need to modify the path of the database in the script above.
* Execute the script sql.createusers.sql. You may want to modify the password. If you modify the password, update the password in the connectionStrings section of the web.config file.
* Execute the script sql.createtables.sql to create all the QLM tables
* Execute the script sql.aspnetnetcore.sql
### Configuring the web service
* At your ISP, create a new virtual directory called QlmLicenseServerNetCore
* Create an Application Pool and associate the virtual directory above to the Application Pool.
* Ensure the Application Pool is configured for No Managed Code
### Configuring the QLM Management Console
* Launch the QLM Management Console
* Go to the Manage Keys tab
* Click Sites
* Click Add to add a new site
* Specify a site name
* In the Primary site field, enter the URL to the License Server: For example:
* Set the Database Engine to SQL Server
* Go to the Encryption Keys tab, then click New for CommunicationEncryptionKey and AdminEncryptionKey
* If you want to configure the QLM Customer Portal to support 3rd party authentication, go to the Authentication tab and set the Client ID of each provider as described in the Authentication Configuration section of this [article](https://support.soraco.co/hc/en-us/articles/360049459532).
* Go to the Deployment tab (formerly Database Connection tab) and enter all the fields on this tab as follows:
* DB Server Hostname or IP: Your SQL server name (including the instance name). Example: SQLEXPRESS\MYDBSERVER
* Database Name: qlm or any other name you have entered earlier in the process when you created the database
* User Name: name of the SQL admin user you specified earlier in the process\
User Password: password of the SQL admin user you specified earlier in the process
* Set the URL to the QLM Customer Portal API
* Set the URL to the QLM Customer Portal App
* Click **Update config files**
* Click Ok
* Upload all the files in the DeployToServer\QlmLicenseServerNetCore folder and subfolders to the virtual directory created above (preserve the directory structure).
* Go back to the QLM Management Console / Manage Keys / Sites / General tab and click the Test button
* If you get an error saying that no products were found, click the **Upload products to License Server** button.
* Then click on Test again to confirm that all tests pass.
### Important QLM License Server settings
The following settings located in the License Server's appsettings.json file are critical.
* Database connection string (refer to the Configure the Database section in the Help)
* Default QLM Engine Version (defaultQlmVersion).
* SQL Syntax(sqlsyntax).
* Communication Encryption Key (communicationEncryptionKey). The communication encryption key is used to encrypt data transferred between QLM and the QLM Web service. This key is like a password that protects your data. You should use a value that is hard to guess and at least 8 characters long.
* Admin Encryption Key (adminEncryptionKey). The admin encryption key is used to encrypt data transferred between QLM and the QLM Web service. This key is like a password that protects your data. You should use a value that is hard to guess and at least 8 characters long.
#### Security Note:
You need to give the anonymous user (IUSR\_XXX, IWAM\_XXX) "execute" privileges to the bin folder.
#### Recommendations
Change the default Communication and Admin Encryption Keys. If you do not, any other QLM customer may be able to view your data.
### Configuring the QlmCustomerSite
The QlmCustomerSite must be configured as an IIS Application. It cannot share the same Application Pool as the QLM License Server so you need to create a new application pool such as QlmCustomerSiteNetCore. You should deploy the QlmCustomerSiteNetCore folder alongside the QlmLicenseServerNetCore folder. You should never create the QlmCustomerSiteNetCore folder as a subfolder of the QlmLicenseServerNetCore folder.
### Important QlmCustomerSiteNetCore settings
* Database connection string (refer to the Configure the Database section in the Help)
* Default QLM Engine Version (defaultQlmVersion).
* SQL Syntax(sqlsyntax). Select "sql" (without the double quotes).
* Communication Encryption Key (communicationEncryptionKey). The communication encryption key is used to encrypt data transferred between QLM and the QLM Web service. This key is like a password that protects your data. You should use a value that is hard to guess and at least 8 characters long.
* Admin Encryption Key (adminEncryptionKey). The admin encryption key is used to encrypt data transferred between QLM and the QLM Web service. This key is like a password that protects your data. You should use a value that is hard to guess and at least 8 characters long.
* webServiceUrl: this is the URL to your QLM License Server. Example:
### Configure the QlmPortal
The QlmPortal must be configured as an IIS Application. It cannot share the same Application Pool as the QLM License Server. You should deploy the QlmPortalNetCore folder alongside the QlmLicenseServerNetCore folder. You should never create the QlmPortalNetCore folder as a subfolder of the QlmLicenseServerNetCore folder.
### Important QlmPortal settings
* Database connection string (refer to the Configure the Database section in the Help)
* Default QLM Engine Version (defaultQlmVersion).
* SQL Syntax(sqlsyntax). Select "sql" (without the double quotes).
* Communication Encryption Key (communicationEncryptionKey). The communication encryption key is used to encrypt data transferred between QLM and the QLM Web service. This key is like a password that protects your data. You should use a value that is hard to guess and at least 8 characters long.
* Admin Encryption Key (adminEncryptionKey). The admin encryption key is used to encrypt data transferred between QLM and the QLM Web service. This key is like a password that protects your data. You should use a value that is hard to guess and at least 8 characters long.
* webServiceUrl: this is the URL to your QLM License Server. Example:
### Configure the QlmCustomerPortal
The QlmCustomerPortal consists of 2 services that must be configured as an IIS Application:
* qlm-portal-api
* qlm-portal-app
Both services cannot share the same Application Pool as the QLM License Server. You should deploy the QlmCustomerPortalNetCore folder alongside the QlmLicenseServerNetCore folder. You should never create the QlmCustomerPortalNetCore folder as a subfolder of the QlmLicenseServerNetCore folder.
#### QlmCustomerPortalNetCore/qlm-portal-api Configuration
Customize the following settings in the appsettings.json file located in the QlmCustomerPortal/qlm-portal-api folder based on your needs:
* Database connection string (refer to the Configure the Database section in the Help)
* Default QLM Engine Version (defaultQlmVersion).
* SQL Syntax(sqlsyntax). Select "sql" (without the double quotes).
* Communication Encryption Key (communicationEncryptionKey). The communication encryption key is used to encrypt data transferred between QLM and the QLM Web service. This key is like a password that protects your data. You should use a value that is hard to guess and at least 8 characters long.
* Admin Encryption Key (adminEncryptionKey). The admin encryption key is used to encrypt data transferred between QLM and the QLM Web service. This key is like a password that protects your data. You should use a value that is hard to guess and at least 8 characters long.
* webServiceUrl: this is the URL to your QLM License Server. Example:
* AllowedOrigins should be set to your primary domain. For example, if the URL to the qlm-portal-app is: [https://mycompany.net/Qlm/QlmCustomerPortalNetCore/qlm-portal-app
The QLM License Server must be installed in the cloud so that it is accessible to your customers.
The system requirements for the QLM License Server are:
* Windows 2012 R2 server or higher.
* [.NET 10 Hosting Bundle ](https://dotnet.microsoft.com/en-us/download/dotnet/10.0)10.0.5 or greater
* Microsoft SQL Server Database (any edition including the free SQL Server Express)
* [Microsoft OLE DB Driver for SQL Server v19](https://learn.microsoft.com/en-us/sql/connect/oledb/download-oledb-driver-for-sql-server?view=sql-server-ver17)
* [Visual C++ Redistributables for x86 and x64 (for Visual Studio 2017)](https://learn.microsoft.com/en-us/cpp/windows/latest-supported-vc-redist?view=msvc-170)
*Before installing the QLM License Server, make sure the above components are installed on your system. To install IIS and enable ASP.NET on your Windows Server, read this* [*article*](https://technet.microsoft.com/en-us/library/hh831475\(v=ws.11\).aspx)*.*
The License Server can be installed in 2 ways: (a) by running the provided setup program QlmLicenseServerSetup.exe or (b) by executing the installation steps manually.
If you are hosting your own website, then the procedure **\[1]** below is recommended. If your site is hosted at an ISP, then you may need to use the procedure **\[2]**.
## Automated installation
### License Server Installation
To install the QLM License Server:
* Locate the setup program in the QLM installation folder. Typically this file is located under:
* QLM v20 and higher: %Public%\Documents\Quick License Manager\DeployToServer\QlmLicenseServerSetupNetCore.exe
* QLM v8 and higher: %Public%\Documents\Quick License Manager\DeployToServer\QlmLicenseServerSetup.exe
* QLM v7: C:\Program Files\Soraco\QuickLicenseMgr\DeployToServer\QlmLicenseServerSetup.exe
* Copy the setup file to your server
* Execute the setup on the server
* Follow the onscreen instructions.
### QLM Management Console Configuration
To configure the QLM Management Console to connect to your QLM License Server:
* Launch the QLM Management Console
* Go to the Manage Keys tab
* Click Sites
* Click Add to add a new site
* Specify a site name
* In the Primary site field, enter the URL to the License Server: For example:
* Set the Database Engine to SQL Server
* Go to the Encryption Keys tab, then click New for CommunicationEncryptionKey and AdminEncryptionKey
* On the server where you installed the QLM License Server, edit each appsettings.json file and update the value of the CommunicationEncryptionKey and AdminEncryptionKey to the values created above (do not remove the curly braces).
* Go back to the QLM Management Console / Manage Keys / Sites / General tab and click the Test button
* If you get an error saying that no products were found, click the **Upload products to License Server** button.
* Then click on Test again to confirm that all tests pass.
## Manual installation
### Configuring the Database
QLM Professional and Enterprise store license keys as well as customer-related information in a database on the License Server.
* Use the tools provided by your ISP to create a database called qlm\_db. Alternatively, you can execute the sql.createdb.sql script located in:
* %Public%\Documents\Quick License Manager\DeployToServer\QlmLicenseServerNetCore\Db.
* You may need to modify the path of the database in the script above.
* Execute the script sql.createusers.sql. You may want to modify the password. If you modify the password, update the password in the connectionStrings section of the web.config file.
* Execute the script sql.createtables.sql to create all the QLM tables
* Execute the script sql.aspnetnetcore.sql
### Configuring the web service
* At your ISP, create a new virtual directory called QlmLicenseServerNetCore
* Create an Application Pool and associate the virtual directory above to the Application Pool.
* Ensure the Application Pool is configured for No Managed Code
### Configuring the QLM Management Console
* Launch the QLM Management Console
* Go to the Manage Keys tab
* Click Sites
* Click Add to add a new site
* Specify a site name
* In the Primary site field, enter the URL to the License Server: For example:
* Set the Database Engine to SQL Server
* Go to the Encryption Keys tab, then click New for CommunicationEncryptionKey and AdminEncryptionKey
* If you want to configure the QLM Customer Portal to support 3rd party authentication, go to the Authentication tab and set the Client ID of each provider as described in the Authentication Configuration section of this [article](https://support.soraco.co/hc/en-us/articles/360049459532).
* Go to the Deployment tab (formerly Database Connection tab) and enter all the fields on this tab as follows:
* DB Server Hostname or IP: Your SQL server name (including the instance name). Example: SQLEXPRESS\MYDBSERVER
* Database Name: qlm or any other name you have entered earlier in the process when you created the database
* User Name: name of the SQL admin user you specified earlier in the process\
User Password: password of the SQL admin user you specified earlier in the process
* Set the URL to the QLM Customer Portal API
* Set the URL to the QLM Customer Portal App
* Click **Update config files**
* Click Ok
* Upload all the files in the DeployToServer\QlmLicenseServerNetCore folder and subfolders to the virtual directory created above (preserve the directory structure).
* Go back to the QLM Management Console / Manage Keys / Sites / General tab and click the Test button
* If you get an error saying that no products were found, click the **Upload products to License Server** button.
* Then click on Test again to confirm that all tests pass.
### Important QLM License Server settings
The following settings located in the License Server's appsettings.json file are critical.
* Database connection string (refer to the Configure the Database section in the Help)
* Default QLM Engine Version (defaultQlmVersion).
* SQL Syntax(sqlsyntax).
* Communication Encryption Key (communicationEncryptionKey). The communication encryption key is used to encrypt data transferred between QLM and the QLM Web service. This key is like a password that protects your data. You should use a value that is hard to guess and at least 8 characters long.
* Admin Encryption Key (adminEncryptionKey). The admin encryption key is used to encrypt data transferred between QLM and the QLM Web service. This key is like a password that protects your data. You should use a value that is hard to guess and at least 8 characters long.
#### Security Note:
You need to give the anonymous user (IUSR\_XXX, IWAM\_XXX) "execute" privileges to the bin folder.
#### Recommendations
Change the default Communication and Admin Encryption Keys. If you do not, any other QLM customer may be able to view your data.
### Configuring the QlmCustomerSite
The QlmCustomerSite must be configured as an IIS Application. It cannot share the same Application Pool as the QLM License Server so you need to create a new application pool such as QlmCustomerSiteNetCore. You should deploy the QlmCustomerSiteNetCore folder alongside the QlmLicenseServerNetCore folder. You should never create the QlmCustomerSiteNetCore folder as a subfolder of the QlmLicenseServerNetCore folder.
### Important QlmCustomerSiteNetCore settings
* Database connection string (refer to the Configure the Database section in the Help)
* Default QLM Engine Version (defaultQlmVersion).
* SQL Syntax(sqlsyntax). Select "sql" (without the double quotes).
* Communication Encryption Key (communicationEncryptionKey). The communication encryption key is used to encrypt data transferred between QLM and the QLM Web service. This key is like a password that protects your data. You should use a value that is hard to guess and at least 8 characters long.
* Admin Encryption Key (adminEncryptionKey). The admin encryption key is used to encrypt data transferred between QLM and the QLM Web service. This key is like a password that protects your data. You should use a value that is hard to guess and at least 8 characters long.
* webServiceUrl: this is the URL to your QLM License Server. Example:
### Configure the QlmPortal
The QlmPortal must be configured as an IIS Application. It cannot share the same Application Pool as the QLM License Server. You should deploy the QlmPortalNetCore folder alongside the QlmLicenseServerNetCore folder. You should never create the QlmPortalNetCore folder as a subfolder of the QlmLicenseServerNetCore folder.
### Important QlmPortal settings
* Database connection string (refer to the Configure the Database section in the Help)
* Default QLM Engine Version (defaultQlmVersion).
* SQL Syntax(sqlsyntax). Select "sql" (without the double quotes).
* Communication Encryption Key (communicationEncryptionKey). The communication encryption key is used to encrypt data transferred between QLM and the QLM Web service. This key is like a password that protects your data. You should use a value that is hard to guess and at least 8 characters long.
* Admin Encryption Key (adminEncryptionKey). The admin encryption key is used to encrypt data transferred between QLM and the QLM Web service. This key is like a password that protects your data. You should use a value that is hard to guess and at least 8 characters long.
* webServiceUrl: this is the URL to your QLM License Server. Example:
### Configure the QlmCustomerPortal
The QlmCustomerPortal consists of 2 services that must be configured as an IIS Application:
* qlm-portal-api
* qlm-portal-app
Both services cannot share the same Application Pool as the QLM License Server. You should deploy the QlmCustomerPortalNetCore folder alongside the QlmLicenseServerNetCore folder. You should never create the QlmCustomerPortalNetCore folder as a subfolder of the QlmLicenseServerNetCore folder.
#### QlmCustomerPortalNetCore/qlm-portal-api Configuration
Customize the following settings in the appsettings.json file located in the QlmCustomerPortal/qlm-portal-api folder based on your needs:
* Database connection string (refer to the Configure the Database section in the Help)
* Default QLM Engine Version (defaultQlmVersion).
* SQL Syntax(sqlsyntax). Select "sql" (without the double quotes).
* Communication Encryption Key (communicationEncryptionKey). The communication encryption key is used to encrypt data transferred between QLM and the QLM Web service. This key is like a password that protects your data. You should use a value that is hard to guess and at least 8 characters long.
* Admin Encryption Key (adminEncryptionKey). The admin encryption key is used to encrypt data transferred between QLM and the QLM Web service. This key is like a password that protects your data. You should use a value that is hard to guess and at least 8 characters long.
* webServiceUrl: this is the URL to your QLM License Server. Example:
* AllowedOrigins should be set to your primary domain. For example, if the URL to the qlm-portal-app is: [https://mycompany.net/Qlm/QlmCustomerPortalNetCore/qlm-portal-app
]()set AllowedOrigins to [https://mycompany.net](https://mycompany.net/company/qlm-portal-app)
#### QlmCustomerPortal/qlm-portal-app Configuration
To configure 3rd party authentication, you need to acquire Client IDs as described [here](https://support.soraco.co/hc/en-us/articles/360049459532).
With a text editor, open the QlmCustomerPortal/qlm-portal-app/assets/appsettings.json file:
* Set the googleLoginKey field to your Google ClientID
* Set the facebookLoginKey field to your Facebook App ID.
* Set the azureAuth / clientId field to the Azzure App ClientID
* Set the apiEndpoint to the URL of the QLM Customer Portal API site and append /api to the URL. Example:
With a text editor, open the QlmCustomerPortal/qlm-portal-app/index.html file:
* Locate the \ entry
* Set the value of href to the path of your qlm-portal-app virtual directory. For example, if the URL to the qlm-portal-app is: [https://mycompany.net/Qlm/QlmCustomerPortalNetCore/qlm-portal-app
]()[,](https://qlm3.net/company/qlm-portal-app,) set href to "/company/qlm-portal-app/"